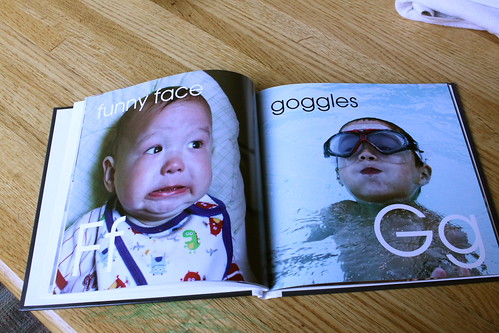
I got a coupon for a free Shutterfly 8×8 photo book. All of my kid “scrapbooks” are 8×11, though, so I wasn’t sure what to use it for. Then I saw a photo alphabet book on Pinterest and decided what better way to curate my [so-far] favorite photos of the boys?
My Instagram photos weren’t high enough resolution for the pages, so I had the brilliant (ahem) idea of putting some of them on the front and back covers, once again repeating the alphabet theme. Below: Airplane, Ball, Camera, Drill, Eyes, Fire Fighter, Golf, Holding Hands, iPad, Jenni, Kitten, and Leaf…
And on the back, Mohawk, Nose, Open, Pool, Quick, Reflection, Starfish, Train, Upside-down, Video, Work, Extra-large, Yucky, and Zzzzz.
I used Shutterfly’s “custom path” to create the photo book, which allowed me to arrange the text and photos wherever I wanted. The font used is Avant Garde.
I recently jumped into amateur video editing to create a few videos for our church’s youth group’s kick-off event. I first created the event video (it was played at the beginning of the evening to introduce the scavenger hunt activity) and then the teaser video, which we posted on Facebook.
SHIV 2012 Preview
SHIV 2012 Video
Planning
In the past, the kick-off event has been called Super-Heroes In Volume, or SHIV (each group dresses up as “superheroes”), but this year, the staff decided to mix things up and the event was called Steve Hafflly’s Ice cream Vendetta, where students would run around the UCD campus following clues to find ice cream sundae components. Steve asked me to help with producing a video. We brainstormed ideas for a “story” — Steve vs. a giant ice cream monster? Steve vs. a deadly bowl of ice cream? The word “vendetta” implied that Steve was getting revenge on ice cream for some wrong, and that made me think of Harry Potter. We decided to put Steve in the role of Harry and “ice cream” in the role of Voldemort, the various scavenger hunt components as “horcruxes,” and decided to draw from the scene in Harry Potter and the Sorcerer’s Stone where Harry’s mother gets killed. Steve came up with the idea of having the ice cream in a bowl, approaching menacingly. I thought it would be funny if we could incorporate baby Benjamin in the role of Baby Harry and then cut to a visual of Steve as Older Harry.
Filming
Originally, we were going to try to re-enact the Sorcerer’s Stone scene, with me as Lily. After thinking about the exponentially larger amount of time I’d need to spend on filming and editing, though — and keep in mind that this was a Monday and we needed the main video by Wednesday — I opted to figure out how to rip scenes from the Harry Potter DVDs and just film a snippet of the ice cream approaching Benjamin, then film the bulk of the explanatory dialogue where the backstory is set up. We recruited Joe, the youth pastor, for the role of Dumbledore – not least because of his awesome wizard-like goatee.
Using a black tablecloth and a chopstick for a wand, we scooped some old ice cream into a white bowl and then worked on filming the few seconds of the ice cream going through an open door. Steve got on his knees and held the bowl of ice cream under the tablecloth. I pulled the stiff fabric of the tablecloth up and around the bowl so it looked kind of like a hooded cloak. Steve slowly brought his arms forward under the tablecloth while I filmed using my Canon Rebel Ti1’s video setting.
Next, we filmed Benjamin with the ice cream slowly approaching. I was looking for a relatively calm, wondering look from Benjamin, similar to the baby in the Harry Potter scene. For the five seconds that we ended up using in the video, it took us a good half hour to film six or seven takes! Each time, I had to adjust the tablecloth, Steve had to get back into place, we had to wedge Benjamin into sitting position again (if he had fallen over on the previous take), I had to adjust the focus on my camera. As it turned out, the second take was the best, but we had some amusing outtakes:
It took us a good hour to film Joe and Steve’s part. Joe found a satin robe from his kids’ dress-up pile, and in lieu of a wizardly beret, went with a do-rag. Luckily they had a can of whipped cream on hand for a prop. Here are three short outtakes – the last one, Steve busts out with an accent without any warning.
Editing
I spent part of my evening editing the main video. First, I did some Googling to figure out how to rip scenes from a DVD. I came across a free Mac App, MacX DVD Ripper Mac Free Editon. After loading in the DVD, I was able to limit the import to a smaller portion of the DVD to just get the few minutes I needed by clicking and dragging on the slider handles. Then, I imported the clip into iMovie, along with the other video clips from my camera, and used iMovie to create the movie.
For the title slides, I used Photoshop and free fonts (Harry P and Lumos fonts) — I’ll cover the how-to’s in a different blog post. I created a graphic image in Photoshop and then saved as a png, then dropped those into iMovie and added a Ken Burns zoom effect.
For the background music, I purchased Hedwig’s Theme from iTunes. I love that iMovie makes it easy – I just dragged and dropped the audio file into the Project timeline! We used iMovie to add the voiceover – it’s Steve talking, but we went into the Clip Inspector and used the “Pitch Down 1” audio effect to distort his voice.
Teaser video
It only took me 15 minutes to create additional title slides and whip up the teaser video for our event preview. Since I had all the video clips imported into iMovie already, I just had to add the title slides, pull in the video snippets I wanted to use, and edit the background music starting point.
Production
Creating and sharing the movie files was easy! I used the iMovie “Share” menu to post the videos to YouTube, then exported the movies into .mov file. Using the iDVD app, I burned the first movie to a DVD so that we could play it at the event.
In conclusion…
My total out-of-pocket cost was 99 cents for purchasing the background music! I already had a nice camera, MacBook Pro, the iMovie, Photoshop, and iDVD software. We spent about four or five combined man-hours for filming, and I probably spent about 3 hours more between editing the movies and researching DVD-ripping software, while Steve spent probably an hour rewatching the Dumbledore/Harry clip to develop his and Joe’s dialog.
We got some good laughs from the youth group students at the Benjamin-to-Steve transition and more laughs at Joe and Steve’s costumes/accents, so I’ll mark this one as a success!
I’ve long been a fan of homemade DIY whiteboards. Any picture frame or mirror or other glass surface works great as a dry-erase surface. This morning, I put together a “chore” chart in Adobe Illustrator, printed it out, slapped it in a frame that had been collecting dust in the garage, wrapped a dry-erase pen in ribbon and tied it to the back of the frame, put some nails in the wall, and now feel motivated to conquer some household grime and clutter!
My chore chart has sections for daily, weekly, monthly, quarterly, and yearly chores. (Don’t judge — I realize some people do what we count as “annual” chores every month or every week!) I put a block to write in a due date and checkboxes for marking off the chores. I also included things that aren’t really “chores” but that we want to make sure get done — for example, a weekly date night and monthly dates with our children. I’m not sure if we’ll really need the “every day” box yet, but I figure for now it will be helpful to know if Steve has already done something before I do it as well.
Download
I’ve included the Illustrator file (CS4) if you’d like to download it and modify it for your own use.
One of the first things I do when embarking on a new SharePoint branding project is to determine the color scheme. Sometimes, the colors are part of the design requirements, but often, I have some leeway in creating suggested color palettes to present to the client. Even if the client has provided a logo with one or two colors, I will still have to determine other colors that will be used in the design or site. For example, you may have one or more background colors to anchor the site, the primary text color, and one or more accent colors. I usually like to create my own color schemes, but if you aren’t sure where to start, or if you don’t think you have an “eye” for color, here are some tips to get you going.
Starting from scratch? Start with a photo.
If you have absolutely no requirements for colors but have to start from scratch, I often find it helpful to start with a nice photo. Some may find it hard to come up with an attractive color scheme on your own, but most people have an innate sense of “that looks nice” when they look at photos, even if they can’t exactly explain why. I tend to be inspired by nature photos, but you may also find interior decorating photos, wedding photos, or party photos inspiring as well. Find a photo that evokes the kind of feeling or mood that you’re going for with your web site — for example, soothing or exciting, subtle or vibrant, corporate or earthy…
Use an online color scheme tool
When you have your logo or photo or even just one initial color, use an online color scheme tool to generate a palette of colors for your site. There are several tools that allow you to upload an image or enter an image URL to generate a color scheme based on the colors in the image; or, you can pick an initial color and then allow the tool to pick colors that go with it. I’ve pulled screenshots from two of the available tools so that you can see how they compare:
In Color Scheme Designer, I entered in the RGB code for a mauve color (the input box is subtle – click on the RGB code to the bottom right of the color wheel and type in your desired color). I then selected “complement” from the color wheel choices above, and a set of colors was generated for me. What’s nice about this app is that you can view light page and dark page examples that use those colors – although you may not choose to use the colors quite like the way they display them, you may find it helpful to see how the colors look in the context of a web page. Below is the “light page” sample:
ColorExplorer allows you to upload an image and then pulls out your desired number of colors from the image.
(Note: Another powerful color scheme generator is Adobe’s Kuler tool. Unfortunately as of this writing, it looks like they’re revamping it, and it should be back up mid-October 2012.)
Or, browse sites.
Of course, you can also browse web sites and find one where you like the color scheme and steal be inspired by it. Some nice web site galleries that I often visit include:
Once I have a color scheme, I can then present the scheme to the client to see if they approve. But if you want to make a quick implementation in SharePoint with your color scheme to see how it looks, modify the Theme colors. Make note of the six-digit hexadecimal/RGB color codes from your color scheme before you begin.
Go to Site Settings and click the Site Theme link under Appearance.
Click on the “Select a color…” links to enter in your color codes.
Click “Apply” and your theme colors will be updated! Take a look and adjust the colors as you want.
Our church has a light-up notification sign in the corner of the sanctuary. When a child is having a hard time in the nursery, the nursery workers punch in the child’s number and the sign lights up so that the parents are notified to go to the nursery. The poor parent has to wiggle around people’s knees to get out to the aisle, then start the long walk of shame down the sanctuary and across the plaza to the nursery, as people stare and give amused and knowing smiles. I always feel slightly embarrassed as the numbers shine out brightly, bathing my hair and back in its red glow, indicating to all that my child is Unsoothable.