Tag: recipe

CSA Days 4 – 7: Salad, broccoli, pasta, and baby bok choy

Day 4: Sunday

Grilled cheese sandwich and salad

For lunch, I made another quick salad with produce box lettuce and mushrooms and oranges from the Farmer’s Market and some pieces of leftover steak. I made a basic vinaigrette with olive oil, sugar, white wine vinegar, salt, pepper, and a dash of dried oregano. Then I made grilled cheese sandwiches with bread from a local bakery… although I did use Kraft processed American cheese singles. I must admit a fond weakness for processed cheese singles!

My favorite way to make grilled cheese:

  1. Butter two slices of bread.
  2. Slice real cheese OR unwrap a cheese single.
  3. Heat small skillet on medium heat until a little warm.
  4. Put one slice of bread, buttered side down, on the skillet. Immediately put cheese on the unbuttered side and top with the other slice of bread, buttered side up.
  5. Gently cook until the bottom side is toasty brown, then flip with a spatula.
  6. Finish cooking the other side.
  7. Slice on diagonal for cute triangular pieces.
  8. If making more sandwiches, turn the heat down just slightly so that the others don’t overcook.

Day 5: Monday

Baked potato with broccoli and cheese

I felt like cooking myself a “real” lunch (instead of my usual fare of leftovers or whatever’s-in-the-fridge), so I decided to bake a Farmer’s Market potato and steam some produce box broccoli.

Having been forewarned about the strong possibility of aphid-infested broccoli, I gave the whole heads of broccoli a good rinsing. But then I realized that the now-dead aphids (dead from being in the fridge for several days, probably) were stuck inside the tiny crevices of the broccoli. Some people might not care about eating an aphid here or there, but once I saw them, I had to do something about them! I ended up spending about 15 or 20 minutes cutting off each floret and painstakingly washing off dead aphids, using a small paring knife to scrape out the little crevices. A bit ridiculous, perhaps, but I think I ended up with the cleanest broccoli I’ve ever had in my life!

And washing the broccoli did give some time for my potato to bake. I used the quick-bake method: Poke a few holes in the potato and microwave for 6-8 minutes until slightly softened, then finish off in the toaster oven for another 15-20 minutes at 450 degrees.

I only ate half the potato, sprinkling it generously with shredded pepper jack cheese, piling broccoli on top, and adding a heaping spoonful of sour cream. I packed the rest of the potato with some broccoli and cheese for Steve’s lunch the next day.

We had a light dinner; I made a repeat salad with grilled cheese sandwich, but adding mustard to the vinaigrette.

Day 7: Wednesday

Pasta with arugula

One of the recipes that came with the Eatwell Farm newsletter was for pasta with arugula. I’ve never cooked with arugula before and didn’t know what to do with it besides including it in salads, so I decided to try out the recipe. Based on previous experience with longer veggie washing times, I washed the arugula in the morning and stored it in a salad spinner. I did end up rinsing the arugula leaf by leaf in a big bowl of water, but it went a lot faster than washing spinach or broccoli.

The recipe instructs you to cook pasta, then make a simple sauce of sauteed garlic in olive oil with some salt, pepper, lemon juice, and white wine. (The white wine turned my garlic green!) Tossing the hot sauce, hot pasta, and raw, chopped arugula helps the arugula to wilt down slightly. Very light meal and pretty tasty; I ended up adding some shredded parmesan cheese for some extra flavor.

The picture above shows the leftovers, packed with steamed broccoli for Steve’s lunch.

Beef short ribs, bok choy, and broccoli

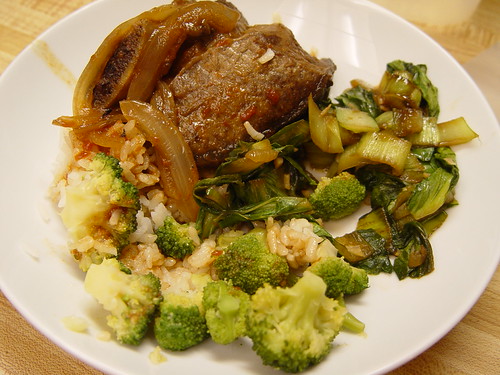
For dinner, I made asian barbecued beef short ribs (a new recipe I found online). I’ve never made short ribs before; since I was working with one pound of ribs instead of the six pounds that the recipe calls for, I only baked them for 45 minutes, afraid of overcooking them. I probably should have baked them for longer as the meat was still pretty chewy. The sauce was delicious spooned over the rice and steamed broccoli, though!

I cooked the baby bok choy with my standard soy-garlic recipe. I also made some homemade chicken broth and made a small side of egg drop soup with one of the larger free-range eggs from my box but forgot to take a picture of it.

Bok choy with soy-garlic sauce

  1. Chop the lighter stems into half-inch pieces, then chop the green leaves coarsely.
  2. Heat olive oil over high heat until quite hot and then brown the stems.
  3. Add some minced garlic and cook for 30 seconds to toast.
  4. Add the leaves and a soy sauce/sugar mixture (about 2 tablespoons of soy sauce and 1 tablespoon of sugar).
  5. Toss until the leaves are wilted and serve.

Free range egg drop soup for two

  1. Smash a clove of garlic and a small piece of ginger and combine with two cups of homemade chicken broth or stock. Simmer for several minutes on low-ish heat, then remove the ginger and garlic.
  2. Pick out your largest free-range egg and beat in a small bowl.
  3. Use a utensil to slowly stir the soup in a circular motion and slowly pour the egg in a thin stream into the moving liquid.
  4. Mix together a small amount (1/2 to 1 teaspoon) of cornstarch and an equal amount of water and add to the soup to thicken.
  5. Add chopped scallions and chopped cilantro. Serve immediately.

What’s left from our box?

  • Several mandarin oranges
  • Leeks
  • Sweet potatoes
  • Kale
  • Turnips
  • Remaining washed arugula, stored in salad spinner in fridge to keep fresh

This is a short week for me — going on a short vacation starting this afternoon until Saturday, but I have plans for all the veggies (except possibly two of the leeks) in yummy-sounding dishes before our next box gets picked up on Wednesday!

Asian-style Chicken Soup

I love soup (I think I’ve said this before!). Here’s a recipe that is pretty flexible for asian-style chicken soup. The broth is a little clearer with less herby flavor and different sorts of veggies are used. My picture doesn’t really do it justice but it gives you an idea!

Chicken soup with asian veggies

Ingredients

  • Chicken legs and thighs (about 2-3 lbs.) – Breast meat isn’t as flavorful and gets dried out if you use it exclusively in this recipe; however, you can have some chicken breast to add later if you’d like.
  • Vegetable oil
  • Water (about 2 qts., although you can adjust for as much liquid as you want!)
  • 1 teaspoon salt for every 2 qts of water you use
  • Vegetables: Some possibilities are daikon radish (for a “real” asian flavor!), cabbage (green or napa), carrots, mushrooms (white, cremini, oyster, straw… any kind you want!). You can vary the amount.
  • Green onions for garnishing (optional)
  • Cooked rice (optional)

Directions

  1. If you want, cut the chicken legs and thighs into two parts using a big cleaver. (This makes it seem like there’s more meat in the soup.)
  2. Heat about a tablespoon of oil in a large soup/stock pot over medium heat.
  3. When the oil is hot, add the chicken and brown on all sides. This will take about 5-8 minutes.
  4. Reduce the heat to medium-low, cover, and cook for another 5 minutes. This helps release some yummy chicken juices so that the broth is very flavorful.
  5. Meanwhile, heat up two quarts of water. This can be boiling or just “hot;” it basically helps speed up the cooking process so that you don’t have to wait for the water to warm up in the soup pot.
  6. Add the water to the pot and turn the heat back up to medium.
  7. Add salt.
  8. Bring the soup to a boil, then turn the heat down again to medium-low and simmer for 10-15 minutes until the chicken is cooked.
  9. Meanwhile, prep your veggies. If using diakon radish, wash well and then slice into thin 1/4″ rounds. If using cabbage, cut into chunks. If using carrots, peel and cut into two-inch pieces, then cut each piece into thin 1/4″ slices (they’ll look like rectangles). If using mushrooms, wash or wipe and cut the bigger mushrooms into slices or halves. The overall goal is to get the veggies into sizes that will allow them to cook through at about the same time. Note: If using green onions, chop but add them as garnish at the end.
  10. Add the veggies to the soup and simmer until they’re tender but not mushy.
  11. Taste the soup without burning yourself and adjust the salt as necessary.
  12. Serve over cooked rice, garnishing with green onions if you like that sort of thing.

If you really like chicken breast, you can add it during step 8 to cook it through, remove it, and shred it. Add the chicken meat after the veggies are cooked (step 10) before adjusting the flavor.

Butternut Squash Soup

Butternut Squash Soup

We’ve had three rainy days (interspersed by warm sunny days) over the past month, so I’m taking that to mean that it’s officially fall and okay to make soup once or three times a week. I could eat soup every day, but that probably wouldn’t be fair to Steve.

So far I’ve made butternut squash soup (twice), miso soup, broccoli soup, and tortilla soup with chicken. On the menu later this week is quick beef soup — a tomato-y soup with ground beef and small bits of pasta.

I had butternut squash soup for the first time last year and it’s become one of my favorite soups. Once you get past the prep, it’s relatively easy to make, although you do have to clean up a blender afterwards. Here’s the recipe I use. I adjust the amounts a little bit depending on what size squash I end up with from the store.

Peel a 3-lb. butternut squash and trim off the ends. Start cutting 3/4″ slices off the narrower end until you hit the hollow where the seeds are. Then cut the squash in half to more easily de-seed the squash. Continue slicing the squash, then cut the slices into cubes.

Peel a medium onion and chop.

Melt 2 tablespoons of butter in a large soup pot over medium heat. Add the onion and cook until it’s softened (5 minutes or so) . Add the squash, 4-5 cups of chicken broth, 2 sprigs of fresh thyme, and a small pinch of nutmeg. Heat the soup until it’s simmering, then cover and cook for 20-25 minutes until the squash is soft.

Get a blender out. Remove the thyme stems. Scoop squash and broth into the blender until about halfway full, then puree the soup. From past experience, you might want to just pulse the soup and hold the top down with a towel so you don’t have a squashed kitchen. Pour the blended soup into a large bowl while you puree the rest of the soup.

Pour the soup back into the pot. Add 1/2 cup of heavy cream and stir in. Heat the soup until it just starts to simmer, then turn off the heat. You can add more chicken broth if the soup seems too thick for you (I like it thick, personally).

Serve the soup. Try sprinkling some ground nutmeg, cinnamon, or cloves over the soup and stirring it in. Some people also like it with sour cream, cheese, or even peanut butter! My personal favorite is ground cloves; Steve likes cinnamon.

I think I have some leftover in the fridge that I can have for my morning snack… Yum!

Old-fashioned samlet

I’m long overdue for another food post, considering how much I enjoy to cook and eat. Today, I’ll introduce you to an invention by one of Steve’s former roommates: The Samlet. I think that’s a mix between “sandwich” and “omelet.”

Samlet.

Similar to a sandwich and an omelet, the samlet can take many various forms, but the basic premise is the same:

  • two pieces of toast
  • a sweet spread (jam, marmalade, jelly, etc.)
  • an optional salty spread (butter, mayonnaise, ketchup, etc.)
  • a fried egg
  • a form of processed meat (salami, sliced deli meat, bologna, etc.)

I have to admit that the first time I watched Steve eat one of these things, I was a bit grossed out. But the combination of sweet and salty is pretty intriguing and something I’ve come to enjoy. It’s also great for using up whatever you have in the fridge, which I think is what originally inspired its creation (or maybe Brian just ran out of mayo and mustard). We’ve heard it said that McDonalds got the inspiration for the McGriddle sandwich from his forward-thinking invention. 😉

The samlet version I have in the photo above consists of whole wheat bread, lightly toasted, spread with plum preserves, with a slice of bologna and a fried egg. Delicious.

Curried Tuna

One of my favorite dishes to make right now is curried tuna from Madhur Jaffrey’s Quick and Easy Indian Cooking. Here is a slightly modified version (I use ginger powder instead of fresh ginger since I hardly have it in the house and I’ve reduced the amount of chili because our mouths are tender). It’s great over rice, although the author says that this is good in sandwiches, on toast, for picnics, or as a stuffing for pastries.

Curried tuna

Curried tuna over steamed white rice and a side of dahl (lentils).

Ingredients

  • 1 1/2 tablespoons vegetable oil
  • 1 small onion
  • 1 clove garlic
  • 1 teaspoon curry powder
  • 1 can (6 oz.) tuna in oil
  • 1/4 to 1/2 hot green chili cut into fine rounds
  • 1/2 teaspoon ginger powder
  • 3 tablespoons chopped cilantro
  • salt and pepper

Directions

Onion and garlic

Chop the onion into fine half-rounds. Mince the garlic (or use pre-minced garlic to save time). Heat the oil in a nonstick frying pan over medium-high heat. When the oil is hot, add the onion and garlic. Stirfry until the onion is brown at the edges.

Curry powder and tuna

Add the curry powder and stir briefly to toast it. Add the tuna and stir to combine and break up.

Chili, ginger, cilantro

Turn the heat to low and add the chili, ginger, and cilantro. Add salt to taste and plenty of freshly ground black pepper. Mix it well until heated through.

Serve at any temperature!

My favorite summer drink: Blackberry Limeade

Blackberry LimeadeMy friend Lucy made this drink for me the other day and it shot up to the top of my favorite summer drink list. Occasionally we can find fairly inexpensive blackberries at fruit stands, local produce shops, or the Farmer’s Market. I think this would work well with frozen berries, too, although I have yet to try it.

Makes about 3-4 servings, depending on how greedy you are.

  • 3 cups blackberries (reserve 8-12 blackberries for garnish)
  • 3 cups water, divided
    Update 7/18 – I just found out that this should be SIX cups of water, not 3. Definitely changes the taste! I prefer the concentrated less-water taste, but you might like the thinner version (and get more drink for your money) as well.
  • 2/3 cup freshly squeezed lime juice (reserve 3-4 slices of lime for garnish)
  • 1 cup sugar
  • ice
  1. Blend the blackberries with 1 cup of water in a blender until totally pureed.
  2. Strain the blackberry juice through a fine-mesh strainer into a large bowl or drink container. You will want to stir around the puree with a spoon to “help” the straining process, as it’s rather thick stuff.
  3. Add the remaining 2 cups of water to the blackberry juice. (I poured the water through the strainer, too, to try to get more blackberry juice out of the puree.)
  4. Add the lime juice and sugar to the blackberry juice mixture. Stir until dissolved.
  5. Fill a glass with ice, then pour in the juice and top with a slice of lime and a couple blackberries. (The juice is very thick; the ice helps to dilute it.)

Our local produce shop had run out of blackberries the first time I tried to make this, so I attempted a batch using fresh strawberries. The strawberries proved impossible to strain, so I ended up just having really thick strawberry puree with a hint of lime… not exactly the same stuff! I’m curious how this would taste with cherries, but I’m unwilling to pay the $4,296 it would take to purchase 3 cups worth of fresh cherries for something that may not turn out well. Plus I’d have to pit all those cherries. 🙂

Quick and Easy Meals

These are the faithful Haffly-household menu stand-bys. That is, when there aren’t leftovers for lunch or I’ve worked a long hard day and don’t feel like cooking “real” food (i.e., a main dish and two side dishes), this is what we often end up eating, with fresh vegetables or fruit on the side.

Continue reading “Quick and Easy Meals”